Installing PVC café blinds yourself can save on professional installation costs and give you full control over the setup. With the right preparation, tools, and step-by-step approach, you can install your blinds safely and efficiently on your Australian deck, veranda, or patio.
Tools and Materials You’ll Need
-
PVC café blind panels (pre-measured for your outdoor area)
-
Mounting brackets or track system (depends on blind type)
-
Screws suitable for timber, metal, or masonry
-
Drill with screwdriver and appropriate drill bits
-
Measuring tape and pencil/marker
-
Spirit level
-
Ladder or scaffold (depending on height)
-
Bottom fixings (straps, clips, or anchors)
-
Optional: rubber mallet for gentle adjustments
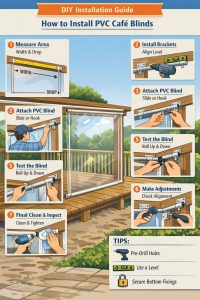
Step 1: Measure Your Outdoor Space
Accurate measurements are essential for a snug fit. Measure:
-
Width: From end to end of your deck, patio, or veranda opening
-
Drop (height): From the mounting beam/roofline to the floor or deck surface
Tip for Australia: Consider additional drop for wind movement. Allow 20–30 mm extra for better sealing if using clear PVC blinds.
Step 2: Select Mounting Points
Identify solid points for mounting your blinds:
-
Overhead beams or pergola rafters
-
Veranda fascia boards
-
Deck posts or pergola posts
Ensure that these points are structurally sound and able to bear the weight of the blind panel.
Step 3: Install Brackets or Track
Depending on the system you purchased:
-
Strap or buckle system: Fix the top brackets at equal intervals along the mounting points.
-
Track-guided system (Ziptrak or channel): Install vertical side channels first, ensuring they are plumb using a spirit level. Then fix the top track securely.
Double-check alignment — uneven installation can prevent smooth operation.
Step 4: Attach the PVC Blind
-
Roll or slide the blind into the top bracket or track according to the manufacturer instructions.
-
For strap systems, secure the top edge with screws or hooks provided.
-
Ensure the blind rolls down evenly without twisting.
Tip: In Australia, UV-stabilized PVC blinds may stiffen in summer heat. Handle gently to avoid creasing.
Step 5: Secure the Bottom
-
Use straps, clips, or anchors to fasten the bottom edge to the deck, verandah posts, or floor fixings.
-
Proper bottom anchoring prevents excessive movement in windy conditions.
-
If using a track system, the bottom rail should slide smoothly into the side channels.
Step 6: Test Operation
-
Roll the blind up and down several times to ensure smooth operation.
-
Check that the blind sits evenly and does not snag.
-
Adjust tension or alignment if needed.
Tip: Outdoor blinds in Australia may expand slightly in hot weather — check operation during different times of the day.
Step 7: Final Adjustments and Maintenance
-
Tighten any loose screws or fixings.
-
Remove protective film on PVC if present.
-
Clean the blind with mild soap and water before first use.
Regular maintenance: wipe down every few months and check straps, anchors, and track alignment, especially after storms or heavy wind.
DIY Installation Tips for Australian Homeowners
-
Safety First: Use ladders safely and have someone assist for larger blinds.
-
Check Weather Forecast: Install on a calm day to avoid wind interference.
-
Pre-Drill Holes: Prevent splitting timber posts and beams.
-
Double-Check Measurements: Accurate width and drop are critical to avoid gaps.
-
Use UV-Resistant Fixings: Outdoor screws and brackets should resist corrosion in Australian climates.